Learn how to create an awesome and professional-looking press page for your Squarespace website in minutes. Read on…
According to Sir Richard Branson, “A good PR story is infinitely more effective than a front-page ad”. Successful business people know the importance of getting press and the role it plays in hyping up your brand. The right kind of press has the ability to broadcast your message quickly, have a clear call to action, and reach thousands of people simultaneously.

Most businesses know the value of good press coverage and they make tons of effort for getting it. However, a common mistake is not making adequate use of that press coverage to generate more leads and propagate the brand message. In other words, what’s equally important than getting press is showing it off!
If you are getting all this publicity and raving reviews for your company, why wouldn’t you want to show it off?! This is where a press page comes in.
What is a press page?
A press page is your central hub for all press mentions, media coverage, social media mentions, and other shoutouts you’ve been getting in the media.
By curating all this important information in one place, you make it easier for clients, partners, prospects, and other journalists and publications to quickly get familiarized with you and what others think of you as a brand or a professional. This, in turn, leads to more brand exposure, more leads, and more press coverage!
However, creating a press page from scratch is not that easy…
Problems with creating a Press Page for your Squarespace website

Adding a press page to your Squarespace website can be time-consuming. For starters, you would have to ask your developer to create a new page for you and give them all the content and article links. Then there will be endless changes and constant back and forth before you are satisfied with your press page.
If you do not have access to a developer and are using a content management system like Squarespace to host your website, creating a new press page can be a difficult task, depending upon the complexity of the page you want. Adding all those text boxes and images and aligning them in a way that looks professional and visually appealing is a huge task in itself!
To make this easy on you, we have an awesome tool that will help you create and embed a press page on your Squarespace website in minutes!
Quickly Create a Professional Looking Press Page with elink!
elink is a content curation tool that allows you to create a press page quickly and effortlessly. With elink, you can create beautiful looking press pages in minutes. Just collect the articles you’ve been mentioned in elink will generate a beautiful and professional press page. You can then:
- Embed this press page on your Squarespace Website for the world to see.
- Share this press page on your social media accounts
- You can even send your press page as an email newsletter to your subscribers!
Yep. Just take your links, put them on our platform and BOOM! you now have your very own, awesome-looking press pages for Squarespace Website! The best part is that you can update this page as you get more press in real-time by adding new articles with a simple click via their robust chrome extension.
Must read: Top 13 Squarespace Plugins You Must Have!
Let’s see how you can create an awesome looking press page in just 4 simple steps!
Step 1: Choose your layout
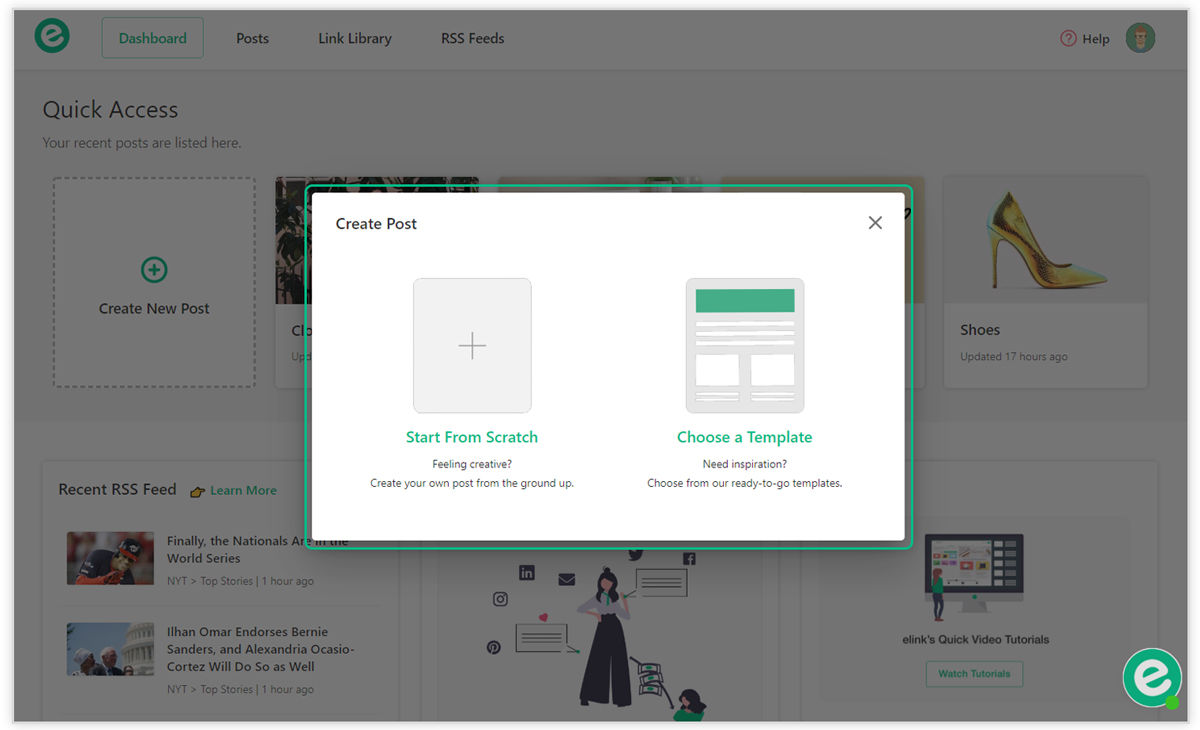
You can either choose to build your elink press page from scratch or can use one of our awesome pre-built press page templates. Either way, it’s very simple to create a press page in minutes! Each template is responsive, so you don’t have to worry about the appearance of your links on different devices with varying screen sizes.
Select from one of the many Press Page templates. All of the templates are responsive and look great on all devices. They have been designed to blend in seamlessly with your website and make them look beautiful.
Step 2: Add a Variety of Web Links

Next up, copy and paste links to the articles, videos, podcasts or other sources that have your brand showcased on the internet to share with your audience and elink will automatically generate an image, a title, and a short descriptive text regarding each link. You can even change the link image by uploading your own images and change the link description into something that suits your press page.
Step 3: Give Your Press Page a Title
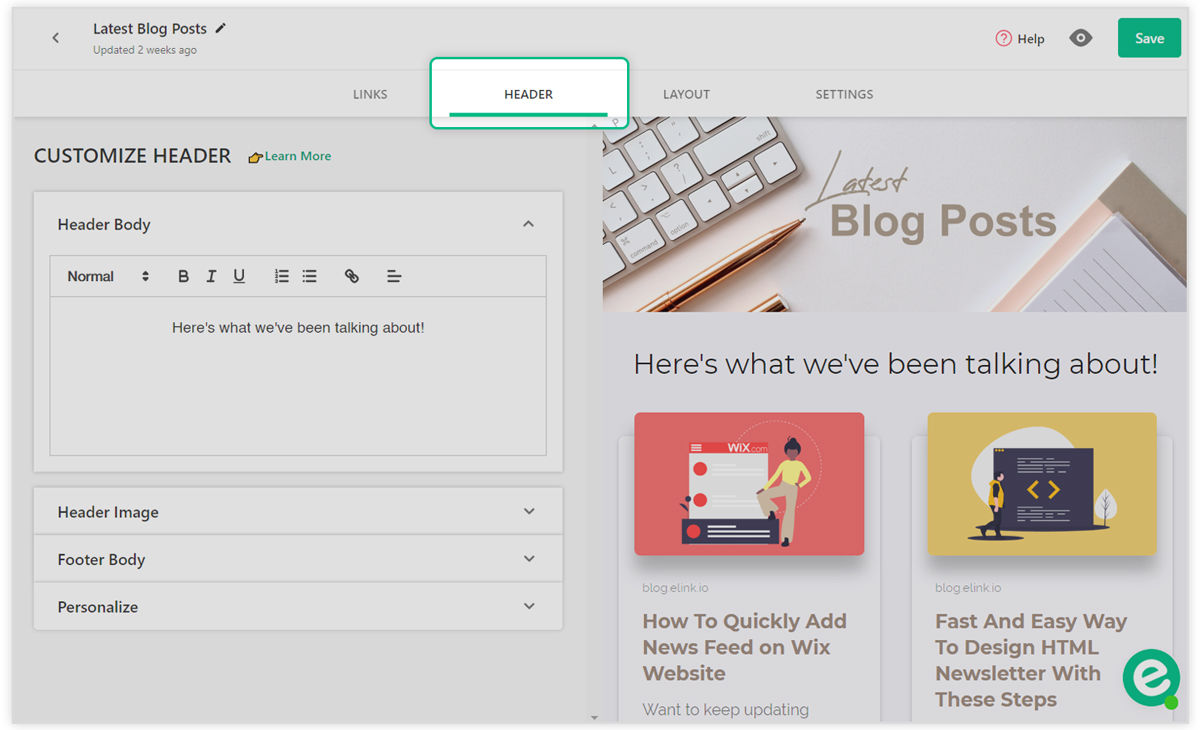
Add a quick title and intro to put your personal touch and commentary on the importance of your Press Pages. It’s a great way to engage your audience and have them understand the importance of the content you’re sharing.
Step 4: Design and Customize

It’s important to add your own design elements to the content you create. In addition to header images, header and text formatting, elink allows you to:
- Change the primary color.
- Update your heading font style
- Choose your body font style
- Update your Call-to-action button text on templates
- Choose a font that is highly visible and blends in well with your overall website experience.
Step 5: Publish & Embed Your Content
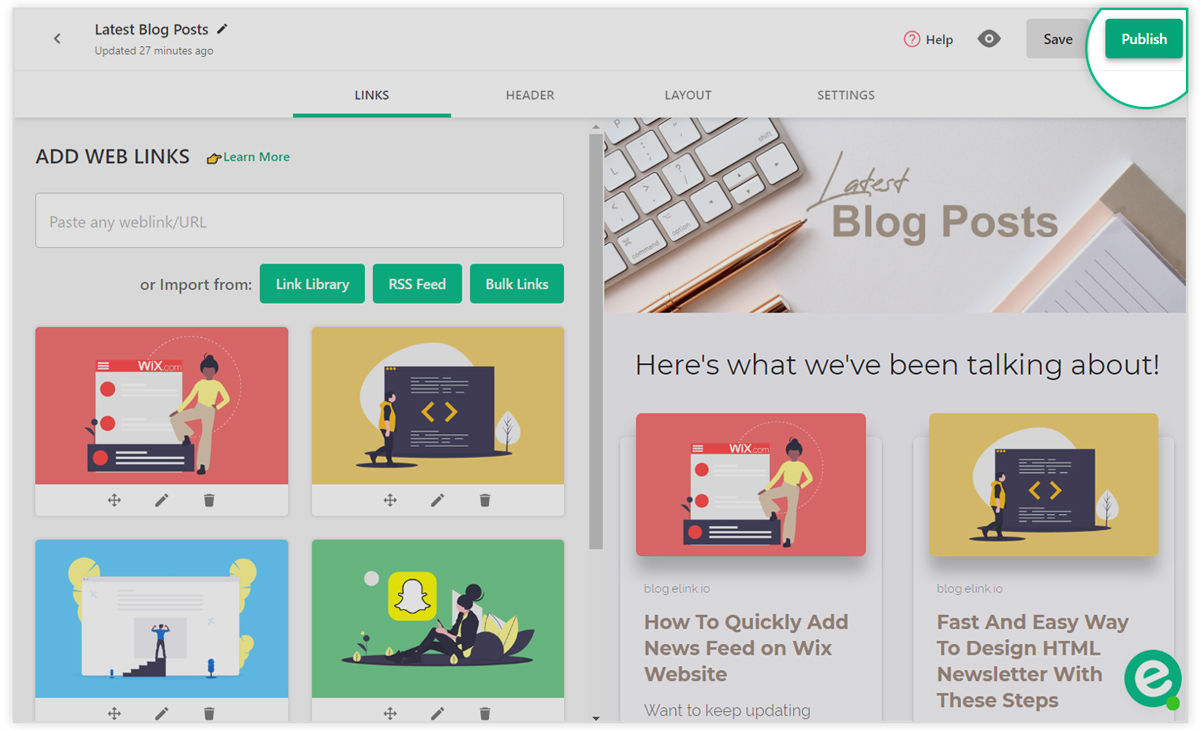
Once you’re done, click on publish and voila! Your Press Page is ready.
Now to export this Press Page to your Squarespace website, go to your dashboard and click on the embed button next to your elink collection.
How to embed your newly created Press Pages for Squarespace website?
If you have your website on Squarespace, you’ll need to follow these steps to add your newly created Press Pages for Squarespace Website:
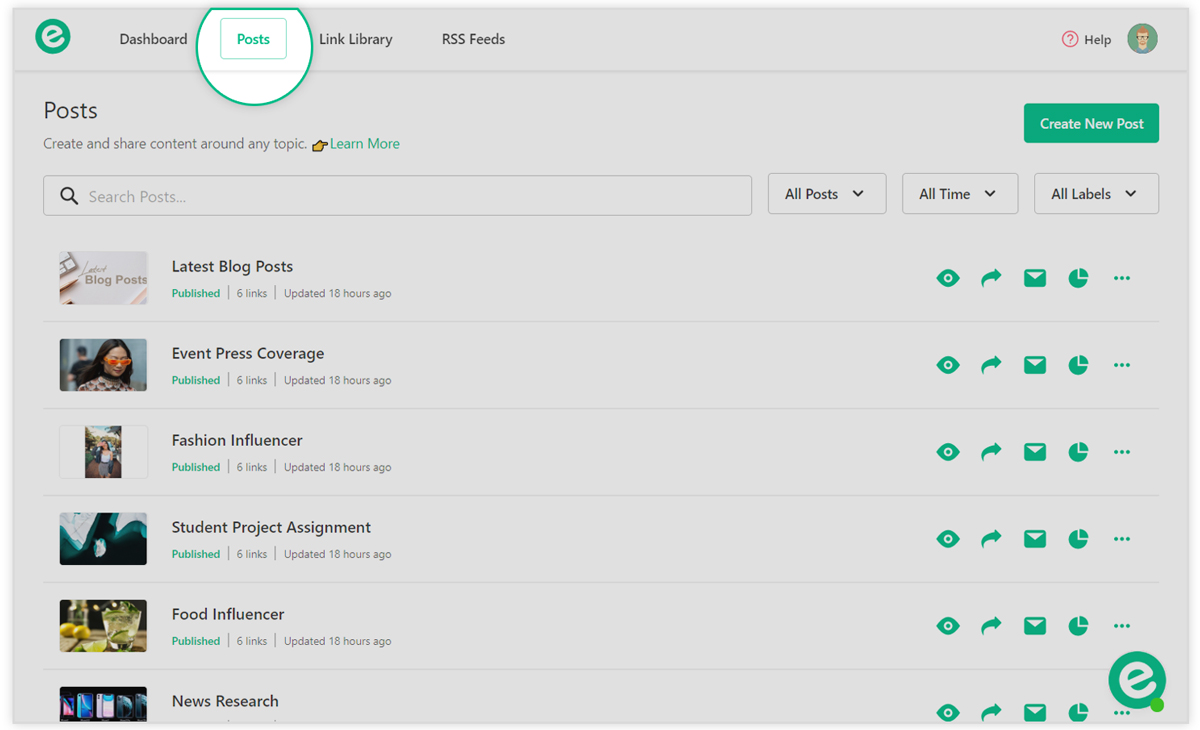
Step1: Click on the Posts tab on elink’s platform.
Note: Make sure you elink is published before you go on to embed it on your Squarespace site.
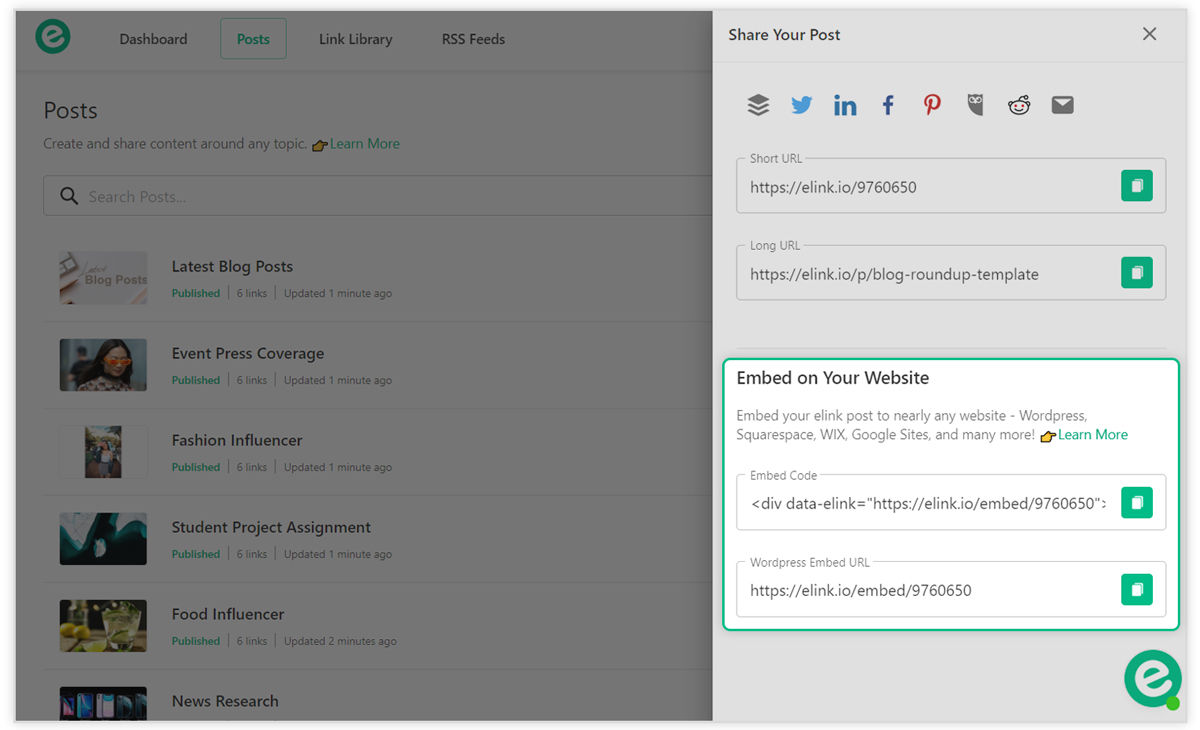
Step 2: Click on the Share icon next to the elink you want to embed.
You’ll see two options 1. Embed Code that you can use on any website builder and 2. WordPress Embed URL
![]()
Step 3: Add the Code to Your Squarespace site
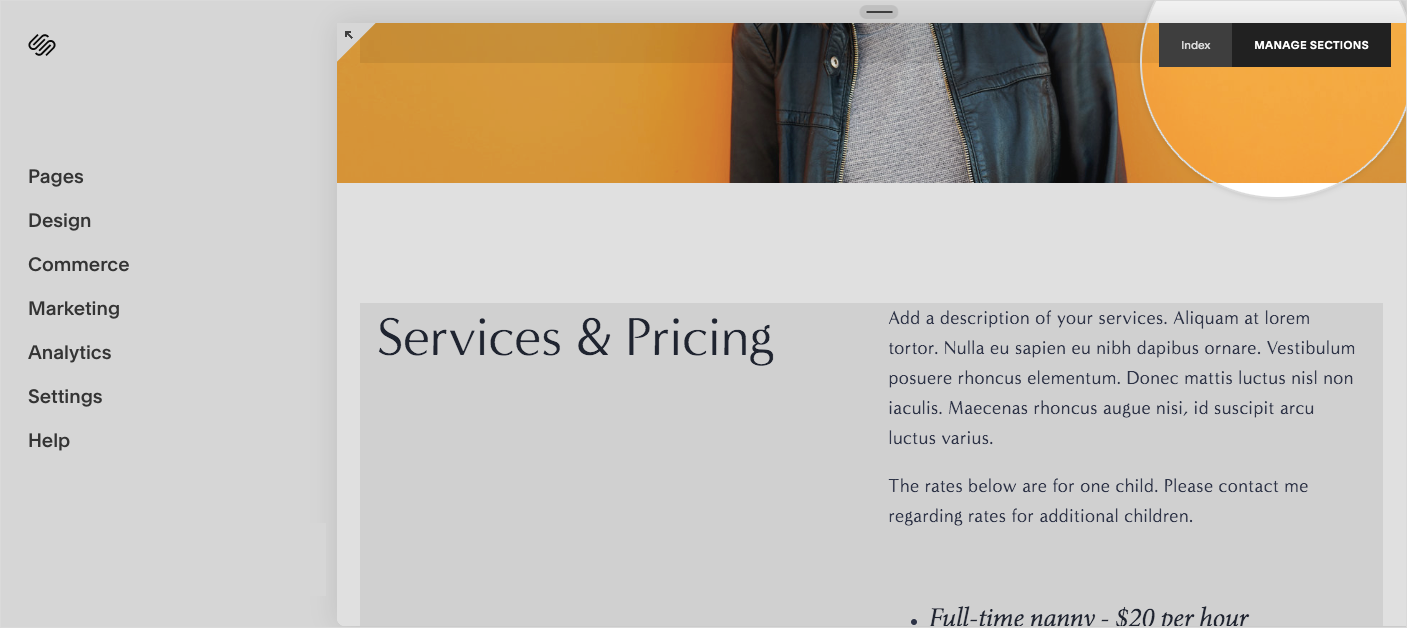
Go your Squarespace site and open a website page that you wish you to embed your elink on and click on the Manage Sections Button
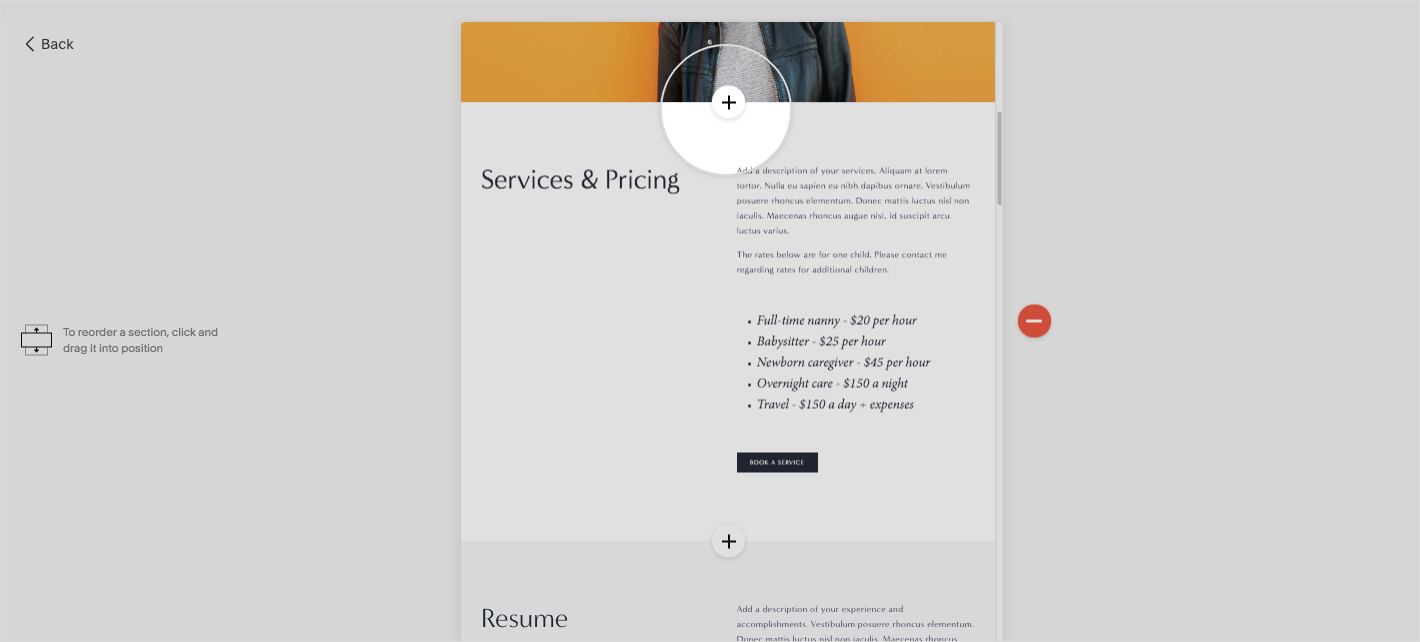
Step 4: Next click the + button.
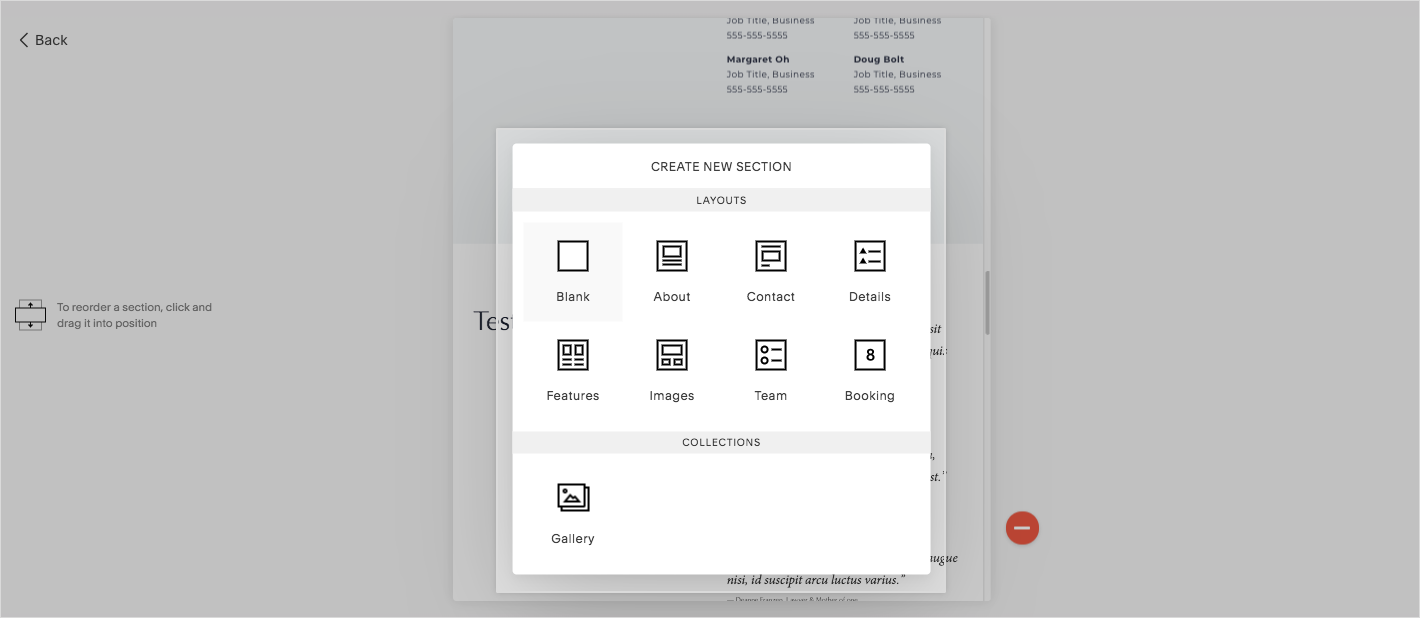
Step 5: Then choose the Blank section layout.
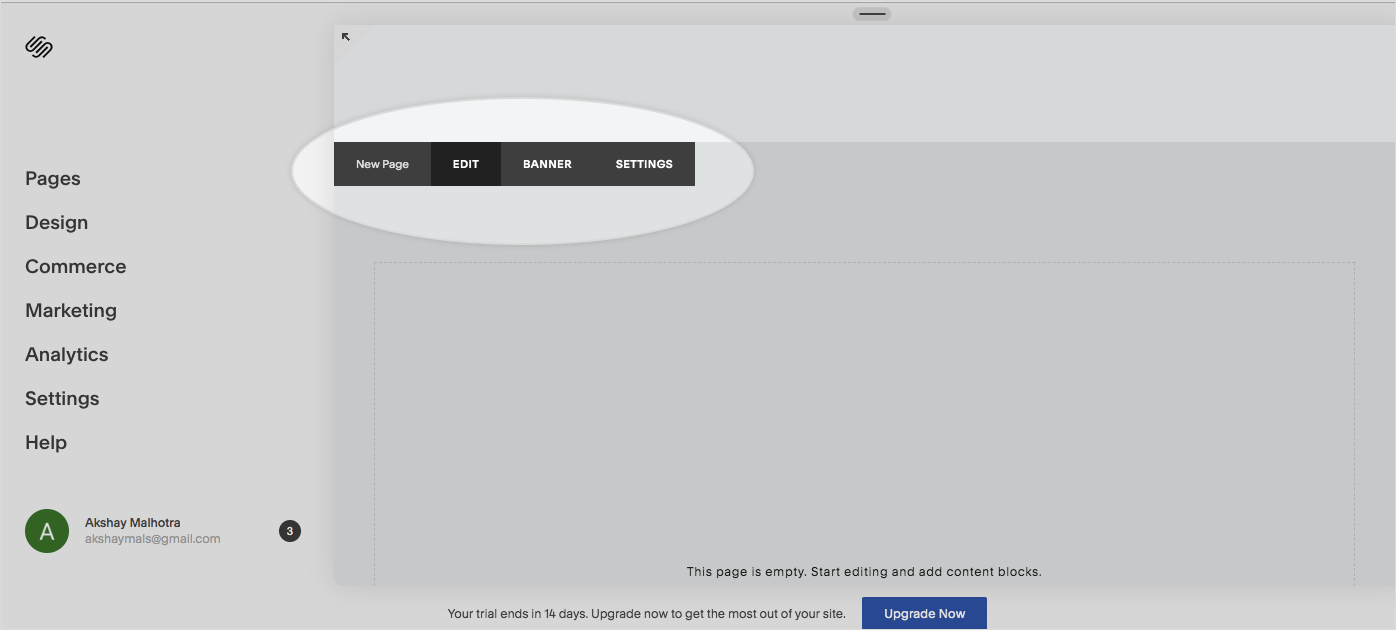
Step 6: Click on the Edit Button.
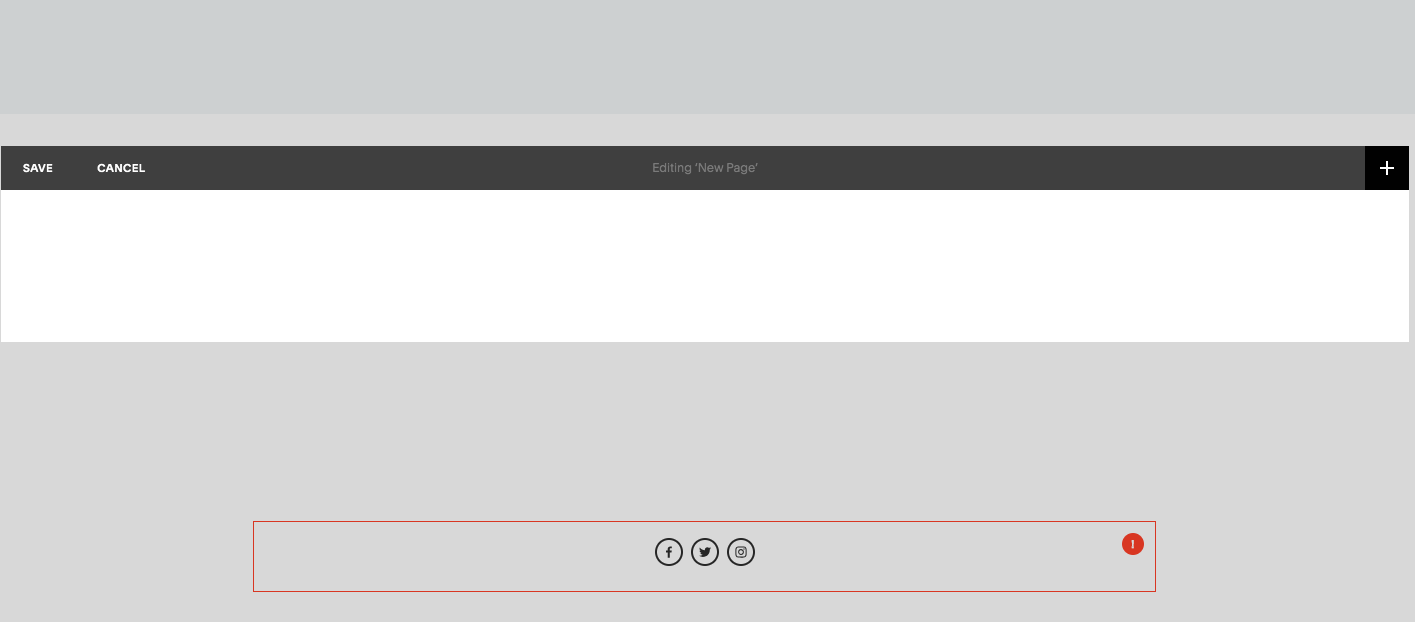
Step 7: Click on the + Button.
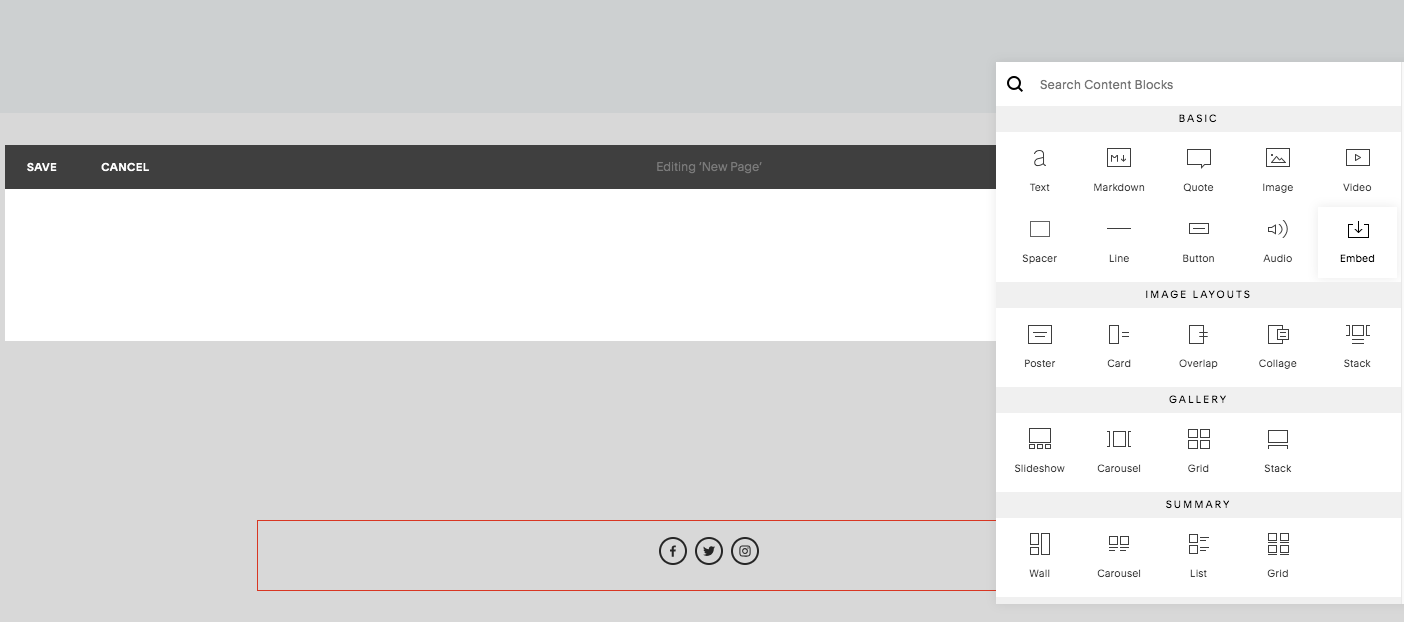
Step 8: Click on the Embed button.
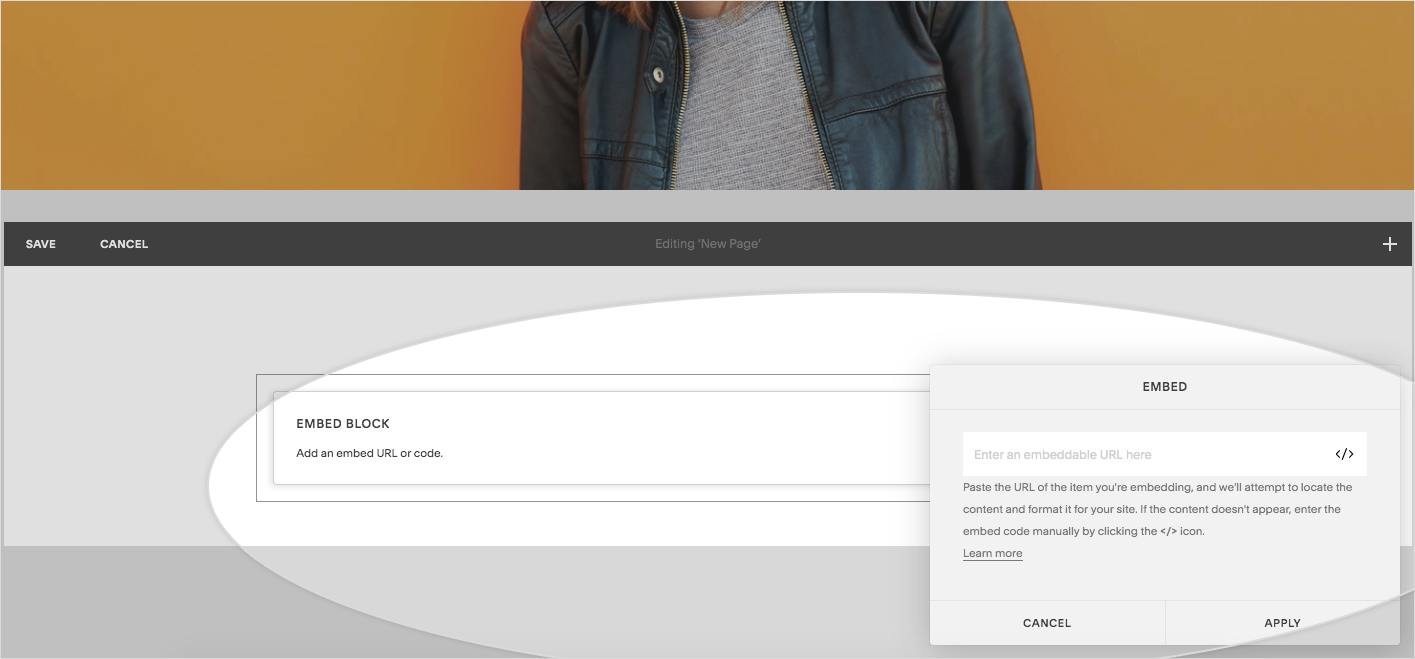
Step 9: Paste in the Javascript and iFrame embed code from elink and click Apply
View your embedded elink on your Squarespace!

Want to watch a video🎥 tutorial instead? There you go👇:
With these simple steps, you can add your elink press page into your Squarespace website easily.
Bonus step: Add elink’s Chrome extension, and make adding links easier!
What happens if you are featured in a new publication AFTER you have already published your press page? Well, don’t worry! You can easily continue updating your press page in real-time by using elink’s Chrome Extension and adding new press links as you browse the web.
Whenever you find a social media shoutout or a new press mention, click on the elink.io Chrome Extension button and it will allow you to add that link to the top of the press page on your website! This helps in keeping your press page fresh with recent press mentions at the top and keep your fans up to date!
Here how to install elink chrome extension:
1. Make sure you’re using a Chrome Browser.
2. Click on this link to go directly to elink’s extension.
3. Click on Add to Chrome.
4. You will then see a small popup asking for permission and click on Add Extension.
5. Once downloaded, you’ll see a page from elink.io that briefly describes how you can use elink’s Chrome Extension.
Over to you!
If you have a Squarespace website, creating a good looking and professional press page is a must. Press pages are an excellent way to attract new press mentions and build credibility amongst your fans. And with elink.io, it’s insanely easy too! With a ton of awesome free templates to choose from, we don’t think you will ever run out of ideas on how to create your Squarespace press page!
Further reads:
- The Best Plugin to Create a Press Page for Your WordPress Website
- Squarespace RSS Feed: How to Create it?
- 9 Squarespace Integrations You Must Know About!
- The Best Online Press Clipping Tool: Elink
- How to Add News Feeds to Your Website in Minutes
- How To Create A Press Mentions Page To Gain Customer Trust
