Image carousels, aka sliders, are more than just a catalog of images. With more browser support now than ever before, the trend of using image carousels has grown and the days of basic slideshows are gone.
Present-day sliders feature splendid imagery, well placed CTAs, thoughtful copywriting, and add visual punch to any website. In other words, they are GORGEOUS.
Big companies like Microsoft & SpaceX have well-designed and stunning image carousels on their websites. Even Instagram uses image carousels to present multiple images to users.
But why one should use image carousels?
How to use them the right way?
How to create them without any hassle?
We’ll tell you all about it. But first, let’s understand what exactly are image carousels.
Image Carousels: What Are They? (Definition)
A single image can make a solid statement about your brand. On the other hand, a group of images can give your website the fresh coat of paint it needs to reach the next level.
Image carousels are a slideshow for cycling through a series of images. Generally placed on the top of a web page, they are super easy to set up and are perfect when you need to showcase a set of images in a relatively small space.

If you’re an organization that sells real estate, you can use image carousels. People who want to buy a home obviously want to see multiple photos of it before they go to see it in person, and a carousel will allow them to do just that.
If you’re a car manufacturer, you can present slides of your vehicle’s elite features to interest buyers. Instead of having to choose images one by one, shoppers can have a better browsing experience if you use an image carousel.
If you are a website developer, an artist, or a graphic designer, an image carousel can be your best friend. You can use it to showcase your work. Even if people do not swipe through it all, they will most definitely get a general impression of your work.
Here are some tips to make sure that your carousel is a fanciful delight and not just a basic slideshow.
Using Image Carousels The Right Way
1. Try to avoid fast auto-rotating carousels.
The biggest reason why people don’t like carousels is that they often advance automatically. Avoid auto-rotating carousels and allow users to proceed through sliders at their own pace. People want to have some sort of control over their interface so make sure that their needs are met.
Tip: You can simply put “prev” or “next” options on the sides of the carousel, or you can even use classic DVD player-inspired controls.
2. Keep the text short and clear.
If you are using auto-rotating carousels, make sure that you keep the copy short & clear.
Here’s how to test if your copy is of the right length:
Add it to the design and then see if you can read it before the slide moves on. (Read it at the pace of an average reader and not like an auctioneer!)
3. Make sure your carousel is touch-friendly.
When you see a carousel on your phone, you often reach out to swipe it right?
It’s far easier than trying to tap that tiny arrow, isn’t it?

So, make it easy (and natural) for your mobile visitors by allowing them to swipe through the carousel.
Remember: Don’t go overboard with effects and don’t make sliders a distraction. Use fewer transitions, choose soft fades instead of jerky horizontal slides.
4. Make the first slide the ‘hero’ of your carousel.
If you have something really important to say, say it on the first slide. Mostly, people have a short attention span and they might not explore your image carousel until the last slide. But they will definitely see the first slide and get your message.
Imagine you have an e-commerce store and you have a series of photoshoots of products.
Now, you want to show these products from various angles or create a product tour so that the visitors can understand what you’re trying to offer.
The best way to do that is to use an image carousel. It will demonstrate all your shots and keep your prospective consumers engaged, despite their short attention spans.
Not convinced yet? Well, there are many other compelling reasons for using image carousels.
Read more: Grid Generator: What is it & How to Use it to Create Grid Layouts?
The Benefits of Using an Image Carousel
1. They promote engagement:
Visual, moving carousels are more appealing than a static, standard picture.

Hence, they are more likely to capture the attention of your target audience and convert them into customers.
2. They are interactive:
Even if your customers are just clicking through your carousel to see more of your photos, they’re still interacting with your brand, right?
An image carousel makes people more aware of your company and products, without having to go through your entire website.
3. They save space:
You will often find yourself in a situation where you want to give your visitors as much information as possible but you don’t want them to scroll through your entire website for it.
There’ll be times when you have limited space but you have a lot to share with your visitors.
No need to worry, because carousels got your back!
4. They ease understanding:
Seeing large chunks of information can be overwhelming for site visitors and honestly, no one likes to read long paragraphs. Image carousels occupy a relatively smaller area and the content is bite-sized, making it much easier for everyone to understand it.
Tip: If you are offering a product that works in a series of steps, you can use a carousel to show all the steps and make it a visual treat for the user.
Always wondered how to get an image carousel on your website? We got you covered!
Luckily, you don’t need to know those super hard coding languages anymore to create an image carousel. You can now create one within a few minutes using elink’s built-in image carousel feature. (Yes, you read that right!)
Without further ado, let’s learn how to create a stunning image carousel using elink:
Read more: 14 Best Websites for Downloading Free Illustrations
Steps for Creating an Image Carousel Using elink
So what is elink? elink.io is an amazing content curation tool that helps you save and build content. Trusted by over 100k users, it is the fastest way to build beautiful content for your newsletters, websites, social media, and more. With its prebuild carousel layouts the hard work is already done and yes these layouts are fully responsive. So let’s walk you through how can you get started on elink in no time.
1. Create an account

Such a boring but mandatory step, isn’t it? You can create an account on Elink in just a few seconds and trust us, it is worth it! Once you log in, you will be introduced to a plethora of amazing features you can explore. (If you already have an account on Elink, brownie points for you!)
2. Create a post
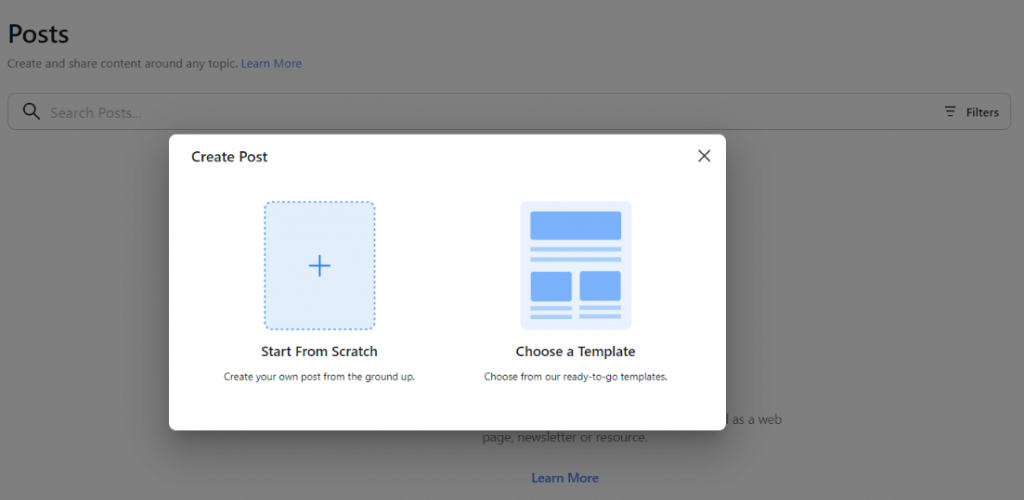
You can either create one from scratch or you can choose from our ready-to-go, super awesome templates. Not everyone has the time and budget to hire a designer, so our team has done all the heavy lifting for you!
3. Add links
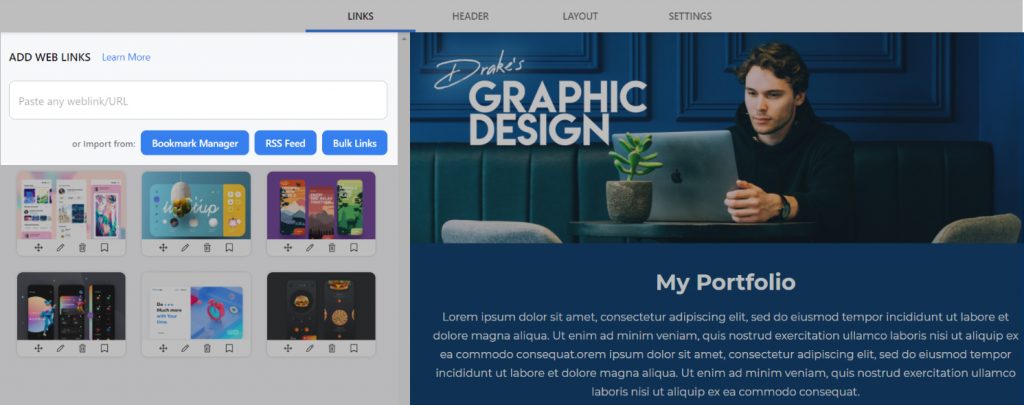
Let’s get straight to business now. Copy and paste links to the articles, images, products or other sources you want to use in your carousel. Elink will automatically generate an image, a title, and a short descriptive text regarding each link.
For us, you are the king so we let you change and customize those titles and descriptions according to your wish! You can even change the link image by uploading a new one.
4. Click on Layout & Choose ‘Carousel’
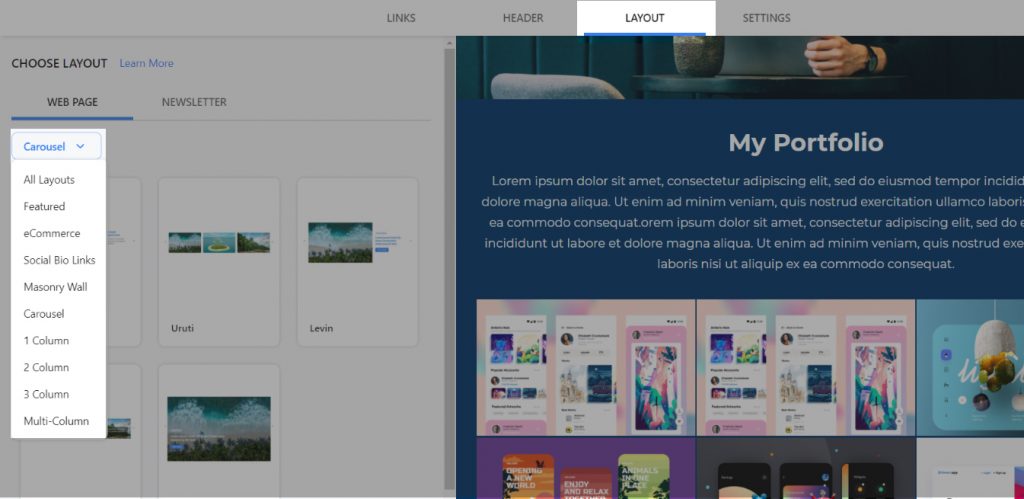
Finally, the step you’ve been waiting for! When you’ll click on layout, and scroll down, you’d see the option of ‘carousel’. You get to choose the layout of the carousel from many different options.

There are many different templates to choose from, so select the one that works best for you. You can customize elements of the theme design too!
5. Customize and design

You can customize the theme’s design by changing colors, font style, and font size. You can also add design elements and use visuals that fit your theme – all in just a few clicks!
6. Publish

Congratulations! You’ve now made an amazing carousel that is ready to be shared with the world.
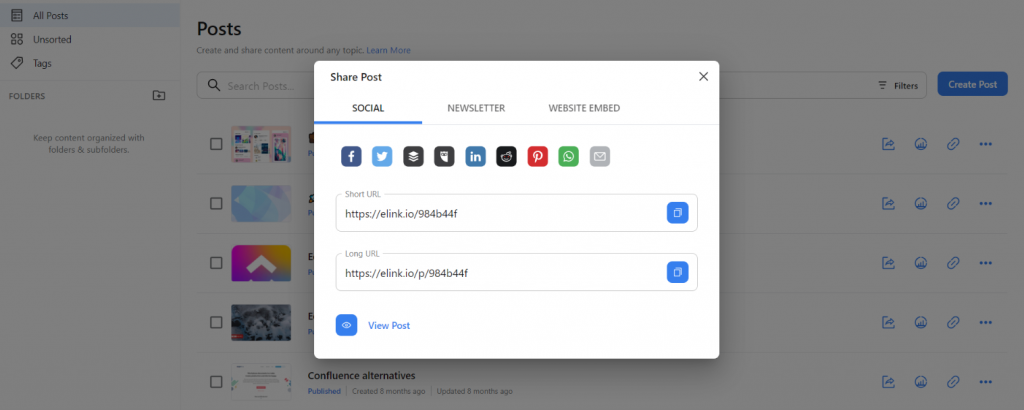
You can embed it on your website (Wix, WordPress, Squarespace, etc.) or share the link online on any social platform. We told you it is super easy, didn’t we?
Final Words
Image carousels, aka sliders, can tell your visitor a lot about your site, without using a single word. They can bring your site to life, engage visitors, and create an immersive browsing experience. Although they don’t cover a lot of information, yet they dish it up in small sections, making everything much more awesome.
Are you ready to give your website a pinch of pizzazz by using image carousels? Let us know how it goes by tweeting us @elink.io.
Further reads:
Create Grid Layouts for Webpages in 5 Simple Steps!
Best WordPress RSS Feed Plugins for Your Website
Best News Aggregator Websites (And How To Build Your Own)
Best Content Creation Tools for Small Businesses
Best WordPress Slider and Carousel Plugins For Websites
